Check out these Weight loss images:
The wieght of the guard rolls on

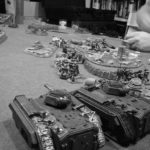
Image by jon_a_ross
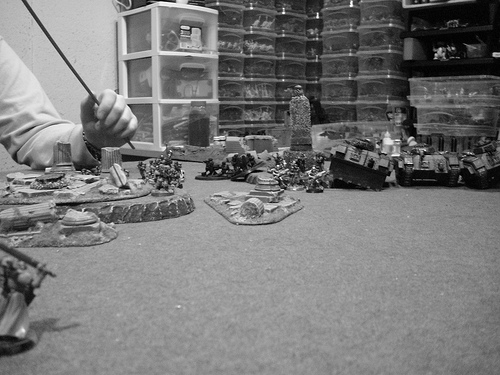
Warhammer battle report Daemon Hunters vs. Imperial Guard
1000 points, spearhead deployment, Annihilation mission.
jon-a-ross.livejournal.com/967909.html
This would be the first time fielding the daemon hunters for me. The battlefield was left set up as it was for the guard vs. necron battle. The logic behind this is that the Grey Knights were not sure if it was a daemonic attack or something else that the guard were able to drive off. The goal of the Grey Knights was to claim the area, search it for clues and then, if required, save the souls of the tainted guardsmen who battled the daemons.
My Grey knights therefore launched their attack with the required two troop choices, taking the third as a fast attack and therefore able to deep strike unit. A hero in terminator armour would lead them. And a Purgation Squad and the Lance off their strike curser would be the heavy support.
The imperial guard were taking three chimera’s loaded with troops, a large block of troops on the ground and heavy weapons to guard the sides. The plan for the guard was to shift their troops into the ruins while the chimera’s curved around the battlefield sweeping up the Grey knights as they did so.
(turn 1)
Grey knights have one troop squad move forward, armed with two psy-cannons. The second troop squad, with it’s two flamers hungry for foes. The purgation squad sits on the hill and attempts to blast the guard. They have range but the damage dealt is minor.
The guard move forward. The full weight of the guard comes down on the five man grey knights unit with the psy-cannons. Only one grey knight survives.
(turn 2)
Grey knights know they are in trouble. They have lost 20% of their troops and dealt almost no damage in return. They also fail to get both of their re-enforcements. The purgation squad fires into the guard, scoring some death.
The imperial guard roll forward, their chimera wall pushing along the north side. The rest of their troops pour into the center. Weapons fire claims a handful of grey knights, dropping the grey knights down to 65% left.
(turn 3)
The grey knights get their re-enforcements, the lance blast strikes into the center temple killing 8. A grey knight squad deep strikes, lead by the terminator hero, fires into a heavy weapons team. Other light losses occur on the guard.
The imperial guard keep rolling forward like a steamroller. Another handful of Grey Knights fall.
(turn 4)
The grey knights blast into the imperial guard. The lance blasts a number, and the Grey knight with the flamer cooks some more. The psy-cannons on the hill blast another couple. The Grey knight hero and his team also add their fire into the guard. Three troops remain standing outside of the chimera. In kill points the grey knights have won, as long as they don’t get wiped out.
The chimera and guard keep rolling ahead on turn 4. They finish off the final grey knight trooper who was in the middle, as well as pick away at the Purgation squad on the hill.
(turn 5)
The Grey knights, victory close, but not close enough, fire into the chimeras trying to at least slow them down. No luck.
The guard, in turn, roll ahead with their tank wave. One chimera gets up to the grey knight purgation squad and unloads a full load of ogryn. The other two chimeras unload their loads of storm troopers on the grey knight hero and squad. It ends quickly, as the grey knights are shot to death.
Victory guard.
Image from page 77 of “Field service notes for R.A.M.C. : incorporating amendments” (1917)
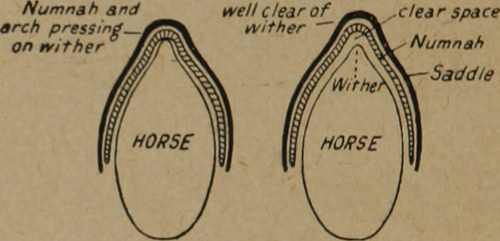
Image by Internet Archive Book Images
Identifier: 101319494.nlm.nih.gov
Title: Field service notes for R.A.M.C. : incorporating amendments
Year: 1917 (1910s)
Authors: Goodwin, T. H. (Thomas Herbert), 1871-
Subjects: Great Britain. Army. Royal Army Medical Corps Military Medicine
Publisher: New York : William Wood & Co.
Contributing Library: U.S. National Library of Medicine
Digitizing Sponsor: Open Knowledge Commons, U.S. National Library of Medicine
View Book Page: Book Viewer
About This Book: Catalog Entry
View All Images: All Images From Book
Click here to view book online to see this illustration in context in a browseable online version of this book.
Text Appearing Before Image:
er work and before food. Remove bits and loosen girths before watering. Bitting.—Corners of mouth should not bewrinkled, the curb chain should lie in the chingroove. Girthing— Tighten girths gradually, see that skinunder girth is not pinched or wrinkled. Shooting.—Aim in centre of forehead at lowesthairs of forelock. Bran mash.—Double handful of bran, add enoughboiling water to moisten thoroughly, cover with ablanket until cool. Forage— Oats should be clean, sweet and hard, and shouldweigh 38 lb. to the bushel. Hay—New hay should not be issued before Octo-ber, 56 lb. to the truss. Straw— Wheat is best, 36 lb. to the truss. On returning from work leave the saddle on for ashort time after loosening girths. 74 Saddle-fitting— Front arch at least one inch clear of wither whenrider is in saddle, the rear points clear of back. Thesaddle should be bedded behind the play of theshoulder. Sore backs, causes— (a) Unsteady or tired riding. (b) Badly fitting tree. Numnah and arch
Text Appearing After Image:
SOffE BACK SAFE (c) Pressure of saddle from horses loss of condi-tion. (d) Long-continued weight in the saddle. (e) Exposure of a hot back to the sun. Shoeing— Do not rasp the walls of hoof. The nails should not be driven inside the line ofwhite horn where sole joins walls. The front nails should come through walls J inchfrom edge of hoof, middle nails slightly lower, andheel nails lower still. Do not cut out the sole or frog, beyond paring offragged ends. Shoes should be removed monthly. Feet must be kept clean. 75 Treatment of Ailments. Cold—Steam by means of a bucket of hot waterwith a little hay in it, a blanket placed overthis andthe horses head. Give plenty of water, with thechill off, to drink. Colic—Move the horse about, hand-rub the belly,soap and water enema, give by the mouth a pint oflinseed oil with I oz. of turpentine or a bottle ofwarm beer. Stoppage of Urine—Shake litter under the horseand whistle, give 2 teaspoonfuls of nitre in a tumblerof water. In giving a
Note About Images
Please note that these images are extracted from scanned page images that may have been digitally enhanced for readability – coloration and appearance of these illustrations may not perfectly resemble the original work.
Image from page 328 of “Journal of radiology” (1920)

Image by Internet Archive Book Images
Identifier: journalofradiolo1192radi
Title: Journal of radiology
Year: 1920 (1920s)
Authors: Radiological Society of North America American College of Radiology and Physiotherapy
Subjects:
Publisher: Omaha, Neb., : [Radiological Pub. Co.]
Contributing Library: The College of Physicians of Philadelphia Historical Medical Library
Digitizing Sponsor: The College of Physicians of Philadelphia and the National Endowment for the Humanities
View Book Page: Book Viewer
About This Book: Catalog Entry
View All Images: All Images From Book
Click here to view book online to see this illustration in context in a browseable online version of this book.
Text Appearing Before Image:
iscovery of a tumor by the patient while bathing. There is smallloss of weight, but practically no distress has been noted. The tumor mass appears in the epigastrium and left hypoehondrium. Physical examinationfailed to differentiate its origin. The peritoneoscope showed the tumor mass to be an enlargement in the left lobe of the liver.The surface was of regular contour. Its color darker than the right lobe. The x-ray observations show no evidence of fixation with any of the viscera. The smalldense line appearing in the illustration between the anterior abdominal wall and the distalmargin of the tumor is the falciform ligament. The upper margin of the tumor mass appearsjust below the line of the diaphragm. Diagnosis: While the tumor could be definitely located as an enlarged left lobe of the liver,there were no findings which would determine the cause of its enlargement. There were nofindings clinical or otherwise to indicate the cause of its enlargement. PEITONEOSCOPE — ORNDOFP 321
Text Appearing After Image:
Case 41. No. 4169 Illustration lateral view—patient lying- left side upward—hips elevated. History indicates menstrual period has been absent for the past three months. There is alsoa history of dysmenorrhea and menorrhagia for the past two years. The patient is at presentsuffering from more or less constant nausea and vomiting. Loss of weight and strength.Physical examination failed to show any abnormal complication of pregnancy in the pelvis. .X-ray observations after pneumoperitoneum had been produced shows mass somewhat largerthan the menstrual period would indicate the uterus should be. The round ligament identifiesvery nicely the true uterine density. The peritoneoscope shows the presence of a mass approximately the size of an orange behindthe uterus. The mass was pale gray in color with a peritoneum showing the usual shiny ap-pearance. The uterus was dark red in color. There was very little evidence of peritonealadhesions. Compare this illustration with Case 34. Without the
Note About Images
Please note that these images are extracted from scanned page images that may have been digitally enhanced for readability – coloration and appearance of these illustrations may not perfectly resemble the original work.