
A few nice Weight loss images I found:
Salmon , salad and juice. Lunch 22.8.12 after an 18 hour “fasting”

Image by ~W~
Chaos giant giving some punch to my beasts of chaos force
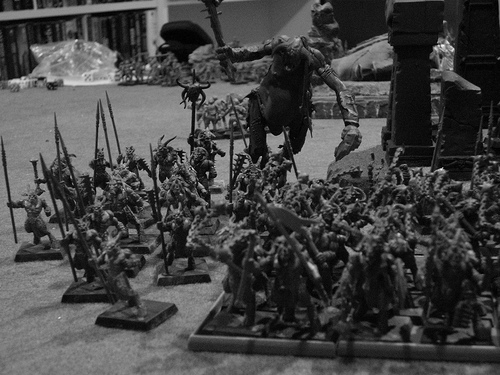
Image by jon_a_ross
A battle of magic: 1000 points of Vampire Counts in the form of two necromantic brothers and their horde’s of zombie followers vs. 1000 points of Tzeentch worshipping beasts of chaos.
Six turns (plus one), beasts of chaos deploy first and go first.
jon-a-ross.livejournal.com/948428.html For the following battle report with pictures:
This battle started out as an experiment to see if a horde of zombies could be a threat, an actually working army. In theory they are cheap enough that you can field a silly number of them, overwhelming mortal armies and dragging them down. To test this out I build a 1000 point vampire counts force using 2 necromancers and 160 zombies. I have 180 zombie models, so with 20 to spare I was all set to roll.
To face the zombies I thought I would see how my beasts of Chaos force works. I have never fielded beasts of Chaos before (and vampire counts only in small warbands battles) so this was going to be an interesting match.
The beasts of chaos got two 8 gor 12 ungor herds, one of which was sent to ambush. Leading the force was a wargor of Tzeentch in Chaos armour and shield, inside a 20 beast unit of Bestigor’s of Tzeentch (Tzaangors). Thinking about it the Tzaangors might have had a magical standard, but if they did I forgot to use it during the game. Rounding out the beasts of Chaos force was a mutated chaos giant, for punch. It turns out to have been an excellent call.
The vampire counts were all zombies as I’ve stated. So the 4 40 corpse zombie hordes with standard and musician would be the bulk. But there was one minor necromancer with the book that has the dancing zombie’s bound spell and the heal undead spell. And the final necromancer general with all three necromantic spells, the nightshroud armour and the scepter of raising the dead mounted on a corpse cart to lead them. I remembered a little late into the game that the general could share his leadership with the troops, something that if I had recalled would’ve put the general even closer to the action and trying to keep all the zombies close enough to get both that bonus and the ability to march.
The battlefield was built to be the site of some fallen settlement, already reclaimed by nature. A small grove of trees, some rocks marking the foundations of buildings and a evil monolith in the center. Looking at the field during the play I found the zombie side wishing their was less terrain on the field. With such large units they were having trouble getting more then one unit into combat at a time, and to win the zombies really needed to double team as much as possible.
In general the beasts of chaos failed their leadership to charge tests only a couple of times, but those moments when they couldn’t get up the nerve to strike bought the zombies time to re-enforce their numbers. Magic was untrustworthy in the game, as I rolled three miscasts using level one and two wizards. The Tzeentch wargor had two miscasts and the zombie general one. I also recall at least two unstoppable force castings. Otherwise both sides had enough dispel dice to counter all but one of the spells from the other. The necromancers had two bound spells and four power dice, but usually I would cast one 2 dice spell off the general and then one single die spell off each necromancer (usually the heal undead spell) followed by the bound spells.
The Tzeentch wargor had rolled up the flaming shield spell as well as a spell that could cause a unit to strike itself, only if that unit isn’t immune to psychology. As the undead are that spell was traded in for the default magic missile zap. In the game only two zaps from the magic missile were successful, but the spell did cast three times successfully. The flaming shield never was cast, it was either dispelled or miscast or even not cast at all (throwing it last after the magic missile using two dice). Magic for the beastmen was not a tipping point.
Turn 1 sees the beasts of chaos rush forward. I was thinking about having the Tzaangors meet up with the beastmen herd and catch the zombies in a pincher movement, but I didn’t want to have my beastmen caught from behind either. I waited to see how fast the zombies would approach. The chaos giant was heading off to deal with the flanking zombies. Some zombies die from magic, but their loss is barely noticed.
The zombies shuffle forward, in such large numbers as to be a threat. The corpse cart and general keep between the large zombie hordes and even summon up some more zombies to join in. The zombies on the flank alone move forward a bit, while the zombies with the necromancer escort are magically encouraged forward.
Turn 2 has the Tzaangors fail their leadership test to charge the fear causing zombies, the general summons the ambushing beastmen herd and the giant charges the zombies on the flank. The beastmen arrive right behind the corpse cart as planned and will force it into a defensive position. The magic phase sees the first miscast from the Tzeentch Wargor and ends. The giant starts jumping up and down on the zombies, something he will do for a while yet.
The zombies move forward on their second turn, pushing forward as their battle plan has already been drawn. The necromancer general summons up and re-enforces a zombie horde to stand between himself and the approaching beastmen. The zombies fighting the giant are not as lucky and find themselves reduced to only four.
Turn 3 sees the wargor of Tzeentch get his men to agree to charge the zombies. The giant will jump on the last of the zombies, and the beastmen herd on the other side will successfully charge the zombies over there. The ambushing beastmen herd will fail to find the courage to charge the zombies summoned up just to deal with them. So far over 40 zombies will have been killed but they do seem to keep on coming.
The zombies charge the beastmen herd that was ambushing them. But even as the beastmen fail their leadership they are able to do enough to win combat against the zombies, who then fail their leadership roll badly (in part because the general was too far away) and lose a number of their troops. The other zombie conflicts continue to push forward, but non zombie losses are light. The necromancer who as babysitting the zombies on the flank runs and in his haste losses the bookmark for his spellbook, casting the dancing one last time on himself to get away.
Turn 4 starts with the giant rushing after the funny little man who dropped stuff. The wargor miscasts for a second time, this time blowing up three of his men, three zombies and taking a wound for his trouble. The beastmen in combat with the zombies keep cutting them down, slashing and cutting, cutting and slashing.
The necromancer doesn’t have much like this round either, with a miscast of his own damaging both himself and the corpse cart he’s on. The zombies are able to charge the beastmen on the flank, hoping to just break them but they past their leadership. Then the flanking charge is hoped to be enough. It isn’t, the beastmen are able to push to a tie on this round of battle. Worse yet, both the zombies slowing down the ambushing beastmen herd as well as the zombies fighting the Tzaangors are both destroyed.
Turn 5 sees three out of the four beastmen units free of attackers and able to push forward to break into the zombie command structure. Only their courage fails them. Both the beastmen herd and the Tzaangors fail their leadership tests to charge fear causing units, leaving the zombie commanders alive and well. One necromancer takes a magic missile but he keeps going with his two wounds. The beastmen herd under the weight of two zombie forces breaks, taking 38 hits for running away from so many zombies.
The zombies follow up on this success by sending the smaller zombie group after the fleeing beastmen, who run further. The rest of the zombies then regroup and move to support the general, turning around and heading back into the center of the battlefield.
Turn six was a bit of a disappointment for both sides. Nothing on the beastmen side was in charge range or passed their leadership tests to charge. The fleeing beastmen kept fleeing. The zombies were able to get seven or so of the mindless buggers to charge the giant but no wounds and all wiped out in a single combat phase.
At the end of the formal game the match was clearly for the beasts of chaos. They had one unit fleeing but all three of the others were mostly undamaged. But the zombies saw a chance that one more turn could change that. It would have to be a perfect turn, but it was possible for a zombie victory.
Turn seven therefore saw the beastmen rally on the flank, as well as the giant and the other beastman herd charge. The giant just runs up to the necromancer and yells at him, ending that battle but causing no wounds to either side. The beastmen that charged the zombies failed to take into account the zombies striking first and the zombies are amazingly able to win the combat. The beastmen break and lose a number of their men to the zombies as they pull down the fleeing troops.
But the zombies do not fair much better. One group of zombies has finally worked it’s way around the monolith and stands ready to surprise the Tzaangors. If the Tzaangors break from combat, as they have already passed the leadership test to be charged by the zombies, they will be lost upon contact with the zombies. The corpse cart takes a direct hit from the giant’s club and even it’s regeneration isn’t enough to put it together. But the necromancer riding it was unharmed, but unable to damage the giant either. The zombies on the flank are lost in their reckless charge against the beastmen (I was hoping for a failed leadership test or similar to give the zombies a chance). And in the end, the zombies against the tzaangors are not enough to break them. It wasn’t even close.
The battle goes to the beasts of chaos.
Image from page 123 of “Stoichiometry” (1918)
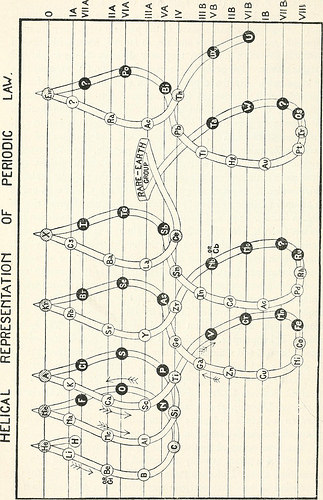
Image by Internet Archive Book Images
Identifier: stoichiometry00younuoft
Title: Stoichiometry
Year: 1918 (1910s)
Authors: Young, Sydney, 1857-
Subjects: Chemistry, Physical and theoretical Stoichiometry
Publisher: London : Longmans, Green
Contributing Library: Gerstein – University of Toronto
Digitizing Sponsor: MSN
View Book Page: Book Viewer
About This Book: Catalog Entry
View All Images: All Images From Book
Click here to view book online to see this illustration in context in a browseable online version of this book.
Text Appearing Before Image:
d this, by asimilar change, is converted into radium B, an isotope of lead withatomic weight 214. Radium A is in group 6 (series VI. U) andradium B in group 4. Radium B is now converted successivelyinto radium C and radium C^ by loss of y8-particles, radium C beingin group 5 and radium C^ in group 6. Another a-particle is nowlost, and radium D, an isotope of lead with atomic weight 210, isformed. Radium D, like radium B, loses y8-particles with formationof radium E (group 5) and radium F (group 6). Finally, radium Floses an a-particle and gives rise to radium G, which is the leadof atomic weight 206 found in uranium minerals. The time occupied by these changes varies enormously, thus forone half of a given quantity of radium to be converted into theemanation, a period of 2500 years would be required, whilst for theconversion of half the total quantity of radium A into radium B,4*3 minutes are sufficient. It is now regarded as proved that, so long as the net charge of 104 STOICHIOMETRV
Text Appearing After Image:
M 6 THE PERIODIC LA W 105 the nucleus of the atom is the same, the element will show thedefinite chemical and physico-chemical character associated with oneor other of the ninety-two places in the periodic table, quite inde-pendently of the nature and constitution of the nucleus. But thesame net charge of the nucleus may result from different absolutenumbers of positive and negative charges, in which case atoms ofidentical chemical character will show different atomic masses, themass being primarily a function, although, in all probability, not asimple additive function of the number of positive charges present.For example, the expulsion in any order of an a-particle, carryingtwo positive charges, and of two /3-i)articles, each carrying onenegative charge, from the nucleus leaves the net nuclear charge andthe chemical properties unchanged, although the atomic mass hasbeen lowered by 4 units by the expulsion of the a-particle. Again,when the series branches {vide thorium C, Fig. 15), a
Note About Images
Please note that these images are extracted from scanned page images that may have been digitally enhanced for readability – coloration and appearance of these illustrations may not perfectly resemble the original work.

Related Posts
 Grilled Bori fish Egyptian style, tomato salad and Tahini. Lunch 16.6.12
 Lemon roasted chicken and salad. Lunch 26.812
 Success: After Weight Loss Surgery 2008 – Charlotte, NC
 Success: After Weight Loss Surgery 2008 – Charlotte, NC
 Success: After Weight Loss Surgery 2008 – Charlotte, NC
 Baby spinach and shrimp salad. Sweet potato dinner 10.6.12